
kicad project template
table of content
- intro
- creating a project from this repo
- configuring repo settings
- project structure
- the workflow
- improvements and future work
intro
when creating hardware project with kicad i alway found my self uploading the bare kicad project in a folder called hardware with a .gitignore and most of the time not even a read me. this became annoying if i wanted to show people what i have created, or even have them look over the schematic since i would forget to generate one or it would be out of date. These problems could be over come with more discipline when creating hardware project, but im lazy and will forget. Therefor i decided to do the correct developer approach spend 30 hours on automating a task that takes 30 seconds. Next is how are these automation going to be done, i could just make a script that would run on a project and do all of this, but that sounds like more effort and something i will just forget to do.
So instead i decided on doing the insane thing of creating this as a template repo in github and having a github action to handle all of this. this doesn’t actually sound that insane but templates repo only feature is you can create a new repo with all these files already in it. This is useful until you realise that means the kicad project name will be the same for all of these templates and that just doesnt fly with me. Imagine opening recent projects and seeing 10 projects called hardware-project. So instead i can use a github action on creation to rename the project to what ever the repo is called, i get back to this nightmare later. This now create the new problem of the github action now needing to be dynamic something that people think is a bad idea, but im to stubborn to listen to them and my music is too loud to hear them.
so now that i have established the vauge overview of how i set up this template, its time to introduce the things that i automated the production of. Using the kicad-cli as this would be the only way i could automate anything with this, it allows me to produce these outputs:
-
electronic rules check
-
design rules check
-
schematic pdf
-
schematic BOM
-
pcb gerbers
These are the most important things and things i forget to do, and so do most of you. The rules checks are especially cool because this allows the workflow to fail if your pcb doesnt pass these, showing you the nice big red fail on your workflow badge, and warning others not to trust your design yet. so lets walk through the setup of one of these project, with some explanations of why i did what i did, because somethings maybe slightly annoying but i did it.
creating a project from this repo
has linked in the heading is a link to the template repo im talking about, within in is project setup section, but i will rehash what is going on in it here for more clarity of what is happening.
creating a new template from a repo is quite simple:
-
click on the button in the top right hand corner called
use this template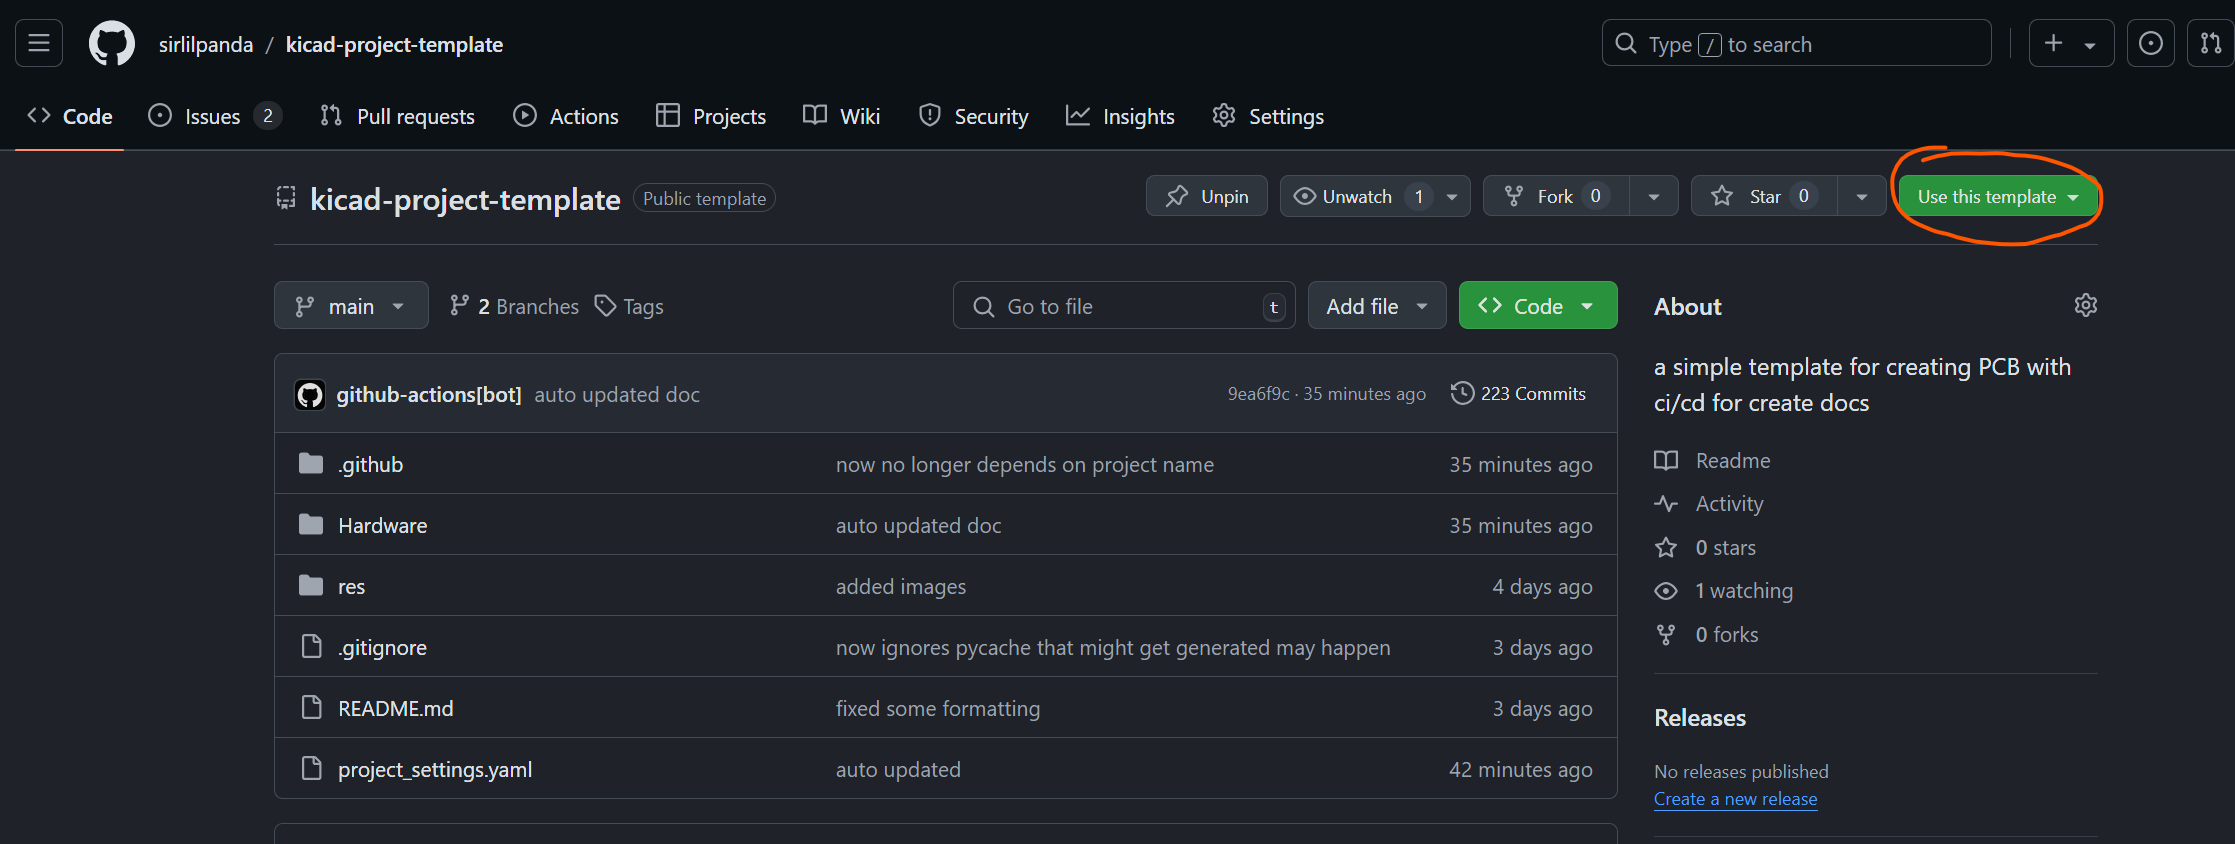
-
when the drop down menu appears click on
create a new repository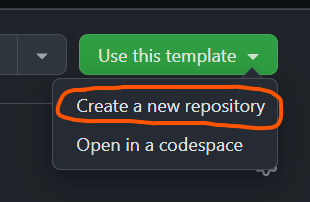
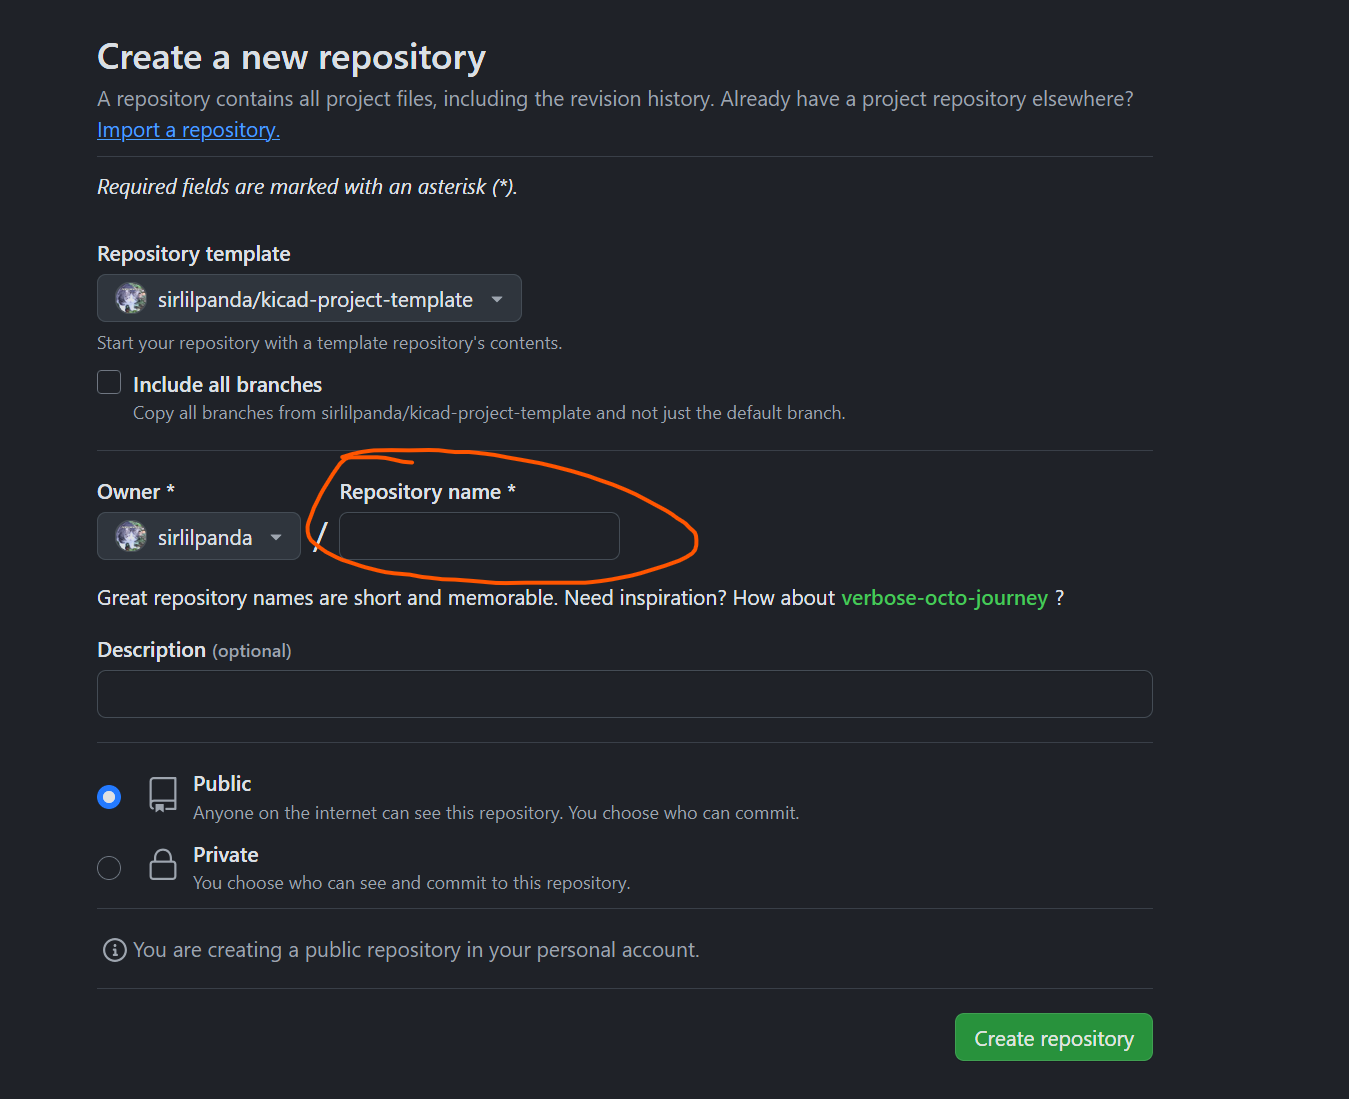
-
once you click you will be brought to this page, note that the repo name you choose here will be the name that you kicad project is called. This was the only nice place i could get you to put in the name of what you are calling your project.
due to the workflow committing to the repo you then have to configure some repo settings
configuring repo settings
once you have created a new repo with the template, you ill have to configure the github action settings. This is because the workflow will need to commit to the repo and this isnt enabled by default for good reasons. therefor to configure this follow these steps:
-
open the repo setting
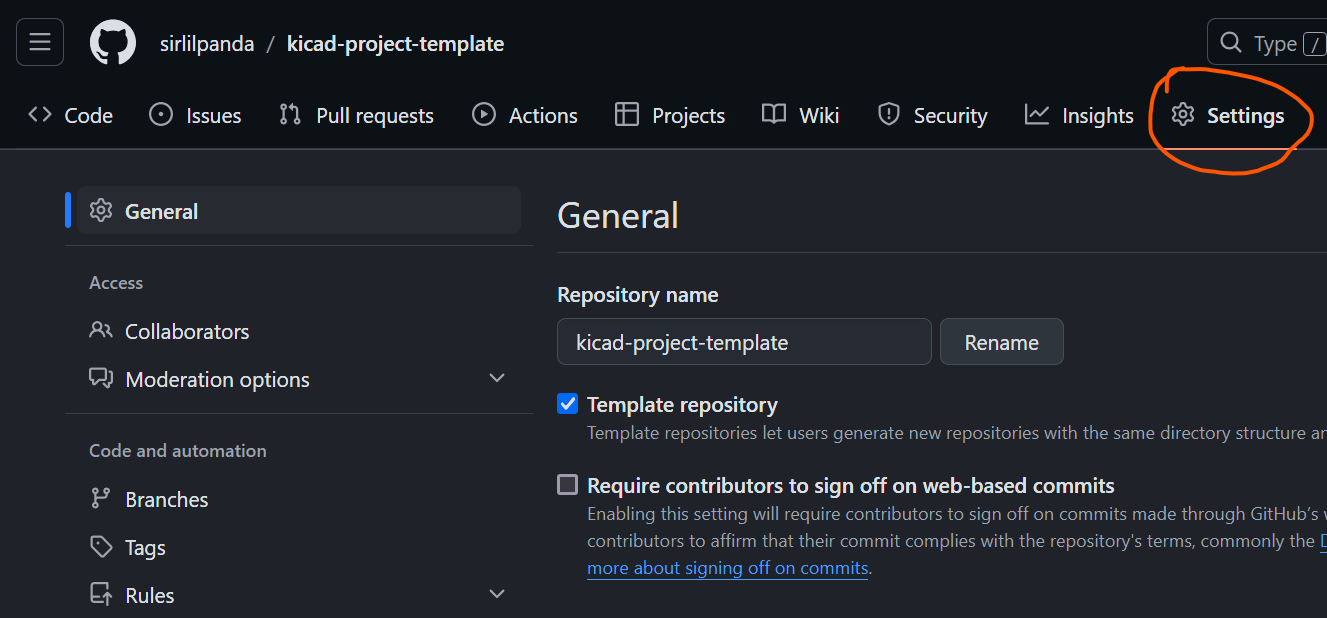
-
then head in to actions : General
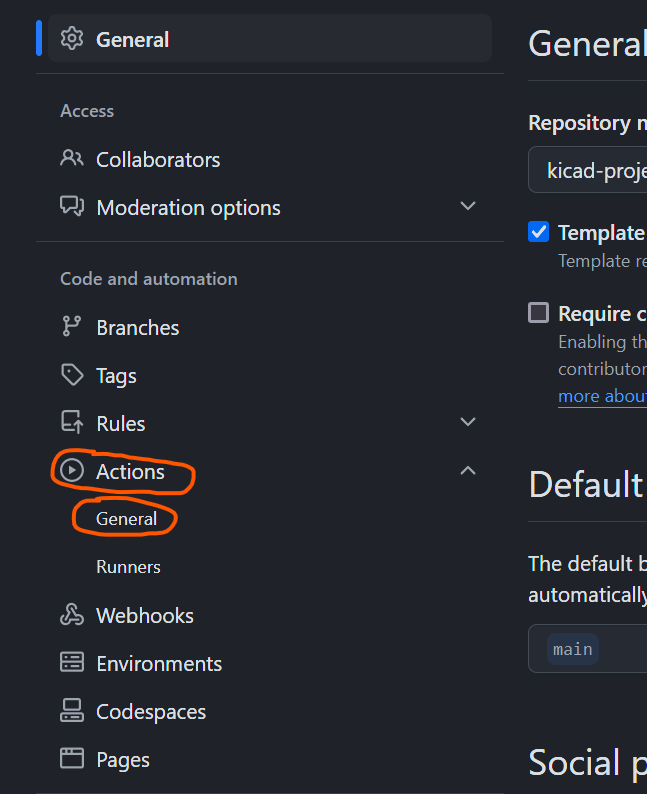
-
then scroll down to workflow permissions and ensure that both
Read and write permissionsandAllow GitHub Actions to create and approve pull requestsare ticked as seen below, honestly i dont know ifAllow GitHub Actions to create and approve pull requestsneeds to be ticked and i dont care to untick it.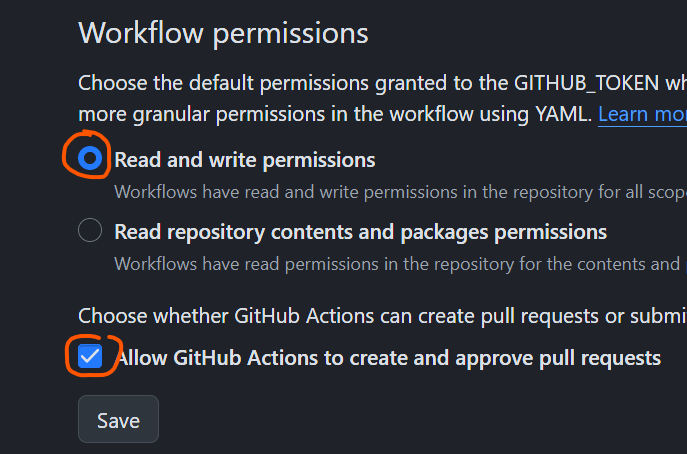
now once this is done i suggest that you re run the workflow before starting to create your hardware.
project structure
yeah yeah yeah, i know you want me to talk about the workflow and how it works, but first we have to look at what the fuck you actually just created. Below is an outline of the project structure but dont worry, unless you want to do something strange and change the workflow, or make new report templates you will never have to go in to the .github/ folder. So lets actually explain what each section does, starting with the .github/ since its at the top, and will be short as this information will be expanded on in the workflow section.
kicad-project-template
┠ .github/
┃   ┠ report_processing/
┃   ┃   ┗ ...
┃   ┠ report_templates/
┃   ┃   ┗ ...
┃   ┠ workflows/
┃   ┠ get_pcb_name.py
┃   ┗ rename.py
┠ Hardware
┃   ┠ {{project_name}}_DOCS
┃   ┃   ┠ BOM/
┃   ┃   ┃ ┠ {{project_name}}_bill_of_materials.csv
┃   ┃   ┃ ┗ {{project_name}}_bom_report.md
┃   ┃   ┗ {{project_name}}_schematic.pdf
┃   ┠ {{project_name}}_PCB
┃   ┃   ┗ {{project_name}}_grbr.zip
┃   ┗ {{project_name}}_PROJECT
┃       ┗ ...
┠ res/
┠ project_settings.yaml
┠ .gitignore
┗ README.md
.github/
within this folder contains all the administrative data and scripts like the report templates and the report processing script. In here is also the github workflow in the workflow folder.
report templates
These are templates for automatically creating reports within the other actions like, this should be fairly self explanatory.
-
bom_report_template.mustachethis template is used for creating the bom reports as can be seen in the production file section -
drc_report_template.mustachethis template is used for creating the step summary reports as can be seen in the erc/drc report section -
erc_report_template.mustachethis template is used for creating the step summary reports as can be seen in the erc/drc report section -
readme.mustachethe hash for this report has already been discussed in the update readme section
report processing script
these are post processing scripts for all the outputs to convert them in to the desired hash for the reports. I may add more information to this if people request it.
-
process_bom_files.py -
process_drc_json.py -
process_erc_json.py -
process_json_reports.py -
process_output_files.py -
violation.py: a common class used between the drc and erc reports as this shares the same schema
get_pcb_name.py this is the script that gets all the kicad project names from the project setting to use for the workflow
rename.py this script is used to rename the project on start up.
Hardware
this is the dir where all the production files are committed too. this is also where the kicad projects are stored.
{{project_name}}_DOCS
this folder is where are the bom files go as well as the schematics this is also a good location for any other items of hardware documenting that you many want to include such as usage guide or build guides.
BOM
within here all the bill of materials outputs such as the *.csv and the bom reports.
{{project_name}}_PCB
this is where the pcb gerbers are outputted too and possibly the *.vrml in the future.
{{project_name}}_PROJECT
this is where the actual main kicad project is stored.
{{sub_pcb_name}}_PROJECT
if you want to add another project do it with this syntax and add it to the project settings under sub_pcb_names all you need to do is a -{{sub_pcb_name}} under the sub_pcb_names and it will be added to the workflow, if you dont want it in the workflow then you can just remove the name from this list.
project settings
these settings are defined within a yaml file as these are actually made to be human readable unlike json which is just a funny looking javascript object in a string. currently there are few project settings although more to come. you can checkout the settings here with there descriptions. or here is a small table ripped from the read me with an overview on them.
there are currently very few project settings that can be changed these are:
-
needs_setup :
a flag to tell the setup action if the project has been set up, this is set by the action step so if you want to rerun the setup step then just set this totrueagain -
project_name :
the name of the project, this will be set to the name of the of repo -
production_formats :
the output production format for the PCBs, i have yet to actually implement this as i doubt no one will use it -
dynamic_read_me :
allow the readme to be updated using the given template -
sub_pcb_names :
the names of all other kicad projects within the repo -
bom_template_path :
the template used to write the bom report files -
erc_report_template_path :
the template used to write the erc report files -
drc_report_template_path :
the template used to write the drc report files -
readme_template_path :
the template used to write projects readme
res
this is just where all the readme images are stored
.gitignore
a barely modified .gitignore for the default kicad one
all it has extra in it, is to ignore __pycache__/ that might be created by one of the python scripts.
the workflow
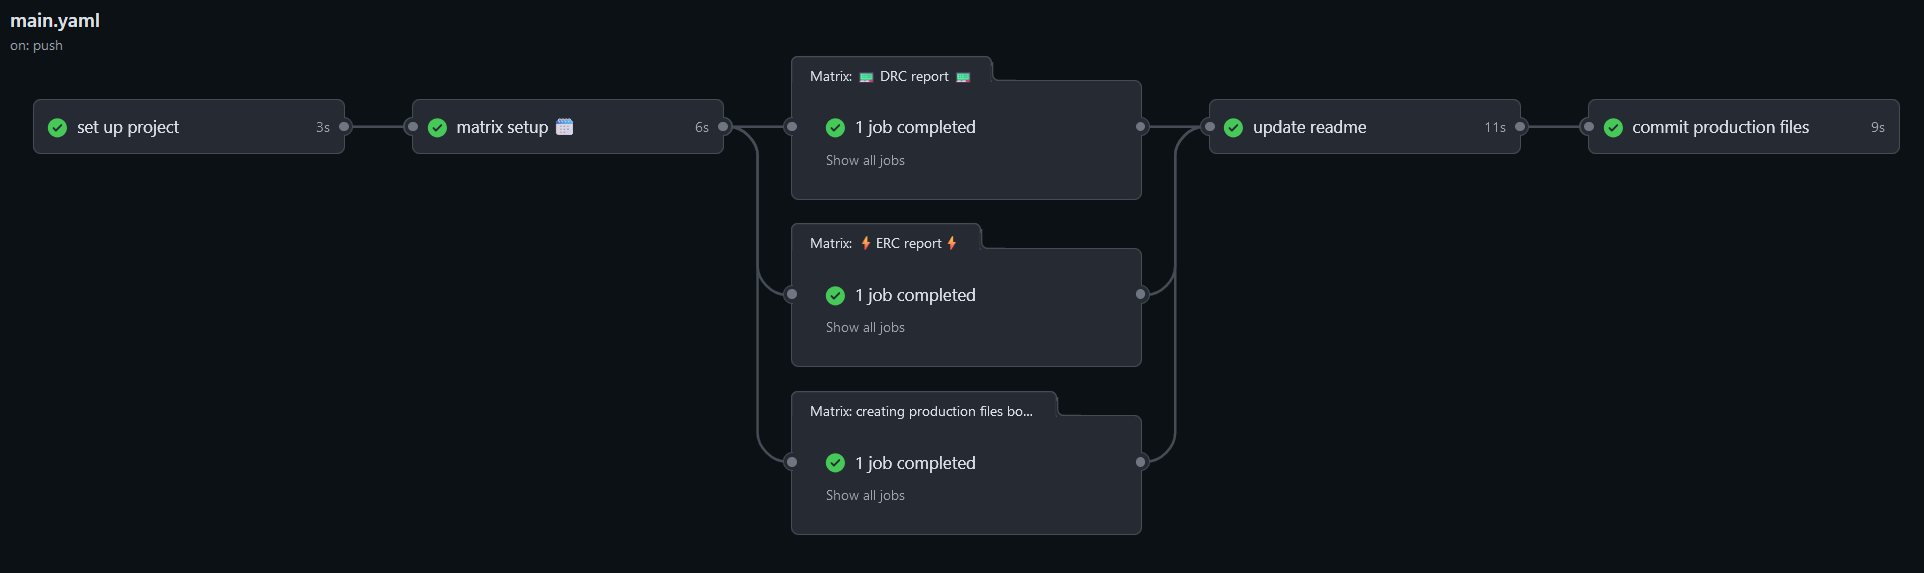
the workflow as can be seen below is a surprisingly complex creature, partly because i believe workflows arnt meant to be used in this manner but here we are. This workflow will run on a push to any of these 3 branches, [main, master, workflow_testing], main and master because thats what people tend to called their primary branch and workflow_testing because i needed a branch for testing the workflow. This will more than likely be changed in the future to be all branches. So what does this workflow actually do:
-
first its checked to see if the project has be setup and if not it will rename all the files and commit them back to the repo.
-
Next the workflow will create a list of the kicad projects that are needed for the next steps. Yes you read that right kicad projects, multiple this was done because more and more project now tend to have another backpack or shield board for faster prototyping and testing.
-
After this list has been created the workflow will run an ERC, DRC and create all the production files needed.
-
once all these checks and production files have been created then the readme updater runs, yes it will auto update the readme of the project, why because you are lazy and will forget to do this. it also shows the status of the ERC and DRC
-
finally it commits all the production files back to the repo
set up project
we will first discuss the project setup step. This step renames the project to what ever the repo name is, as this is most likely what you were going to call your kicad project anyway. This step has to be run everytime the workflow is started, why? you may ask, because the trigger that would run on the creation of a repo doesnt exist, but do you know what does trigger on the creation of a repo the push trigger. So this setup action ends up running each time, but dont worry because it only runs about 2 steps before it checks project settings and sees that the project has already been setup and all later steps are skipped(yes you might ask why doesn’t the action just finish early with a success, well because they havent implemented this). So now lets go through the steps that this action does:
-
checkoutthis pulls down the repo -
read yaml filethis read the project settings and outputs an object of the settings -
check setupthis spits out the state of thehas_been_set_upsetting -
Setting up Pythoni dont need to explain this -
installing requirementsinstalling the requirements that the rename script needs mainlyruamel.yamla yaml parsing library that allow for the comments to stay while changing the values -
rename project if setup has not been completedrenames the project using the repo name, also sets thehas_been_set_upsetting to true and theproject_namesetting to the name of the repo. This is done by using therename.pyscript, why did i use python for this because python funnily enough is a scripting language. -
commits production filesthis just commits the changes back to the repo
matrix setup
As much as i would love this to be setting up a virtual world, it sadly is not*. This step reads the project settings and get the project name as well as all the sub PCB name. This jobs main purpose is to create and output a list that can be used to run the ERC, DRC, and production files jobs on the multiple projects. As you can see this doesnt do alot but ill still outline the steps for consistency.
-
checkoutit needs to get the project settings somehow -
Setting up Pythonsets up python -
installing requirementsinstallspyyamlfor reading the project requirement, this was done as its nicer thatruamel.yamlwhich i have strong opinions about. -
get kicad project namesgets all the name of the projects in the project settings and throw it in to the$GITHUB_OUTPUTfor the next jobs to use, I could have probably just done some bash trickery with this, but this was nicer and more people can modify it if they want to.
* it kinda does since github actions actually run in a fully virtualised environment so it kinda is a virtual world.
ERC and DRC reports
Im lumping these in to the same section as they do basically the same thing, just on different parts of the project. this action runs the DRC/ERC on the kicad project and creates a report on it, that nicely gets outputted in the actions tab as a job summary as can be seen below.

yes i know the emojis are a nice touch, it looked to boring without colour. however you might also be asking yourself why dont these look like the reports i get out of kicad when i export my reports, or if you havent save the DRC or ERC reports from kicad, below is an example of them. As you can see perfectly readable although they are not the prettiest thing out there. therefor i decide to do some processing to them instead.
ERC report (2024-11-06T11:14:43+1300, Encoding UTF8)

***** Sheet /
[endpoint_off_grid]: Symbol pin or wire end off connection grid
    ; warning
    @(97.7900 mm, 98.4250 mm): Horizontal Wire, length 9.5250 mm
[endpoint_off_grid]: Symbol pin or wire end off connection grid
    ; warning
    @(97.7900 mm, 95.8850 mm): Horizontal Wire, length 9.5250 mm
...
and like this for the design rules check:
** Drc report for bluetooth_dac.kicad_pcb **
** Created on 2024-11-06T11:17:14+1300 **

** Found 88 DRC violations **
[track_dangling]: Track has unconnected end
    Local override; warning
    @(212.8800 mm, 73.3500 mm): Track [+3.3V] on F.Cu, length 1.1900 mm
[via_dangling]: Via is not connected or connected on only one layer
    Local override; warning
    @(195.6927 mm, 80.6449 mm): Via [/SPI_CS] on F.Cu - B.Cu
...
before you ask no i did not process the raw txt reports that would be insane and not something i would do just dont look back to commit 3632978, that was not me and you have no proof. However this was because the output format of the report could be selected. This allows the reports to be spat out as json rather than plain text. The schemas for these json file are found at the top of the file, but these are out of date and no longer go to anywhere. However they do exists within the kicad repo and they can be seen here, DRC schema ERC schema. Although there is a problem with the ERC report output as json, the position doesnt actually output as as its said mm, but instead outputs in decimeter. This is a simple fix if the file is an erc report just multiply the pos by 100, but annoying to find out.
Now to actually create these reports i used a templateting language called mustache. This allows for the creation of a template report that can then be filled in with what mustache calls a hash, just a funny looking bit of json that will fill out these reports. These template reports can be found funnily enough in the report_templates/ directory, under erc_report_template.mustache and drc_report_template.mustache. When you open one of these reports the hash schema can be found at the top. However you might notice that these hashs arent the same json as the report json. Well as you guess i did post processing on output reports to create the hash i wanted. why you may ask it created a slightly nicer and easier to read. The original didnt have things like total number of errors per sheets, and all the warns and errors were meshed together in one large array which made it harder to read, because when the ERC fails you want to look of the errors first not the sieve through all the warns until you find the error you want. It also allows things for things like the markdown version of the name to be computed allowing for fast traversal of the report. So lets look at one of these reports when the rules check has failed.
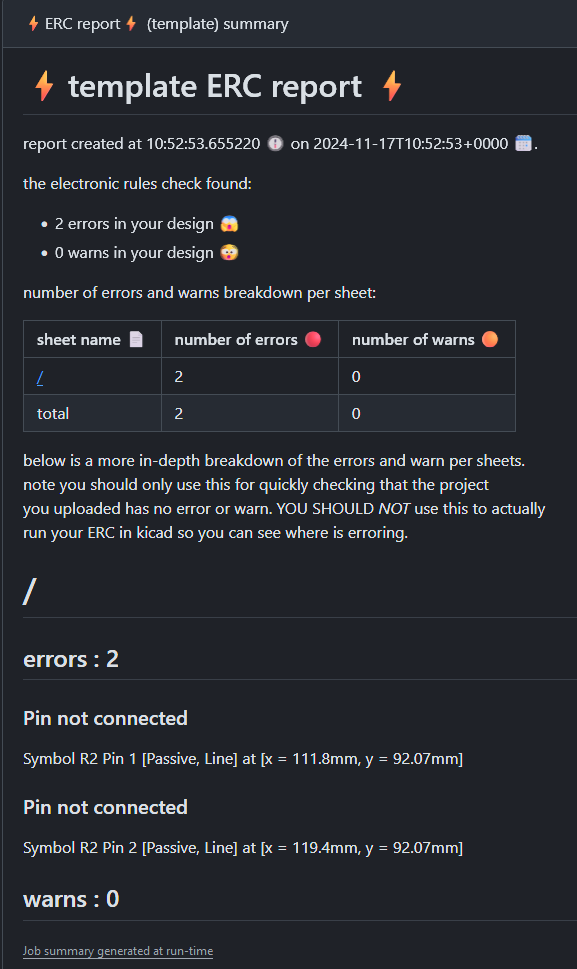
at the top the title of the report can be seen with a time stamp of when it was made. just below that we have the number of the total warns and errors, and below that is a break down of them per sheet in this case for the ERC report. The sheet name in this table is a link to the section for that. After that we can see the section that contains the sheet with the title being the sheet name, and 2 sub heading of warns and errors. Within these sub sections a list of the violation that cause this, the violation name, what symbols are causing it and its position on the sheet.
And just encase it wasnt clear enough as these are templates you too can create your own report with either the hash that is provided or you can modify the report processing scripts to create your own hash to make your own custom reports.
lastly this step also uploads an artifact this artifact is called {{project name}}_erc.json or {{project name}}_drc.json which ever one is being run, which is used for the updating readme step. This artifact is a simple piece of json that can been seen below:
{
    "passing_erc":"true",
    "project_name":"template",
    "erc_summary_link":"https://github.com/sirlilpanda/kicad-project-template/actions/runs/11885615488/attempts/1#summary-33115574474"
}
this just contains simple information like whether the erc/drc passed, the name of which kicad project was being processed and lastly a link to the summary card that it produced. This data is uploaded as an artifact since its the only way to get around matrixes not having a nice way to output.
And now after that, here is what the steps of the work flow does
-
checkoutgotta run the erc/drc on something -
read yaml fileneeds the project settings for the report templates -
sets up pythonpython is used here for processing the template reports and putting in the hash to create the new reports -
install requirementscant run the python script if you dont have the requirements -
run ERC/DRCthis uses an made by Spark Engineering for processing running the ERC or DRC -
creates ERC/DRC report in markdowncomputes the new hash from the json output and creates the new report using the mustache template -
upload report summaryuploads the report to github as a job summary -
get summary urlusing an action to get the link to the summary that was just created -
prints summary urlthis exists mostly for debugging -
create files to uploadthis creates the json that was perviously discussed -
upload data for readmethis uploads the json that was perviously discussed
Production files
The production files, the stuff that should always be in repo. This stuff is also things you are most likely to forget to add to the repo, these are:
-
the bom so people know what is needed for the project
-
a bom report for if you want to do some post processing to the bom;
-
schematic pdf so people can judge your design faster
-
gerbers for if someone doesnt know how kicad works but still wants to make your project.
The only odd thing this job does is creates a bom report, why? so if you want to add an api call for showing how much your project will cost. I have yet to implement anything like this but you could implement and API from mouser, octopart or digikey. If you are going to do this i would suggest digikey or mouser as octopart believes extorsion is a fair cost for api usage. Just like the ERC and DRC reports the bom report uses a mustache template as well as a very basic processing script.
All these production files, the bom, bom report, schematic pdf and gerbers all get uploaded as an artifact, this is done as there is no way to collect all the outputs of a matrix-ed workflow, therefor this is the workaround. The production file job also uploads some json as can be seen below. The json mainly contains links to the generated file as well as the project name for identification from which matrixed workflow it came from. further reasoning on why these links are created will discussed in the readme section.
{
    "project_name" : "string",
    "project_link" : "link",
    "schematic_link" : "link",
    "gerber_link" : "link",
    "bom_report_link" : "link",
    "bom_csv_link" : "link"
}
And now after that, here is what the steps of the workflow does
-
checkoutneed to create the production files from something -
read yaml filethis is needed to get theproject_namefor creating the right paths -
setting up pythonthis is needed for processing the BOM report -
installing requirementscant run the python script if you dont have the requirements -
export production filesthis creates 3 files,sch.pdf,bom.csv,gbr.zipschematic pdf, gerbers and bom -
moving production filesthis moves the outputted files to the correct location in the repo and renamed to a more descriptive name
sch.pdf->{{matrix.project_name}}_schematic.pdf
bom.csv->{{matrix.project_name}}_bill_of_materials.csv
gbr.zip->{{matrix.project_name}}_grbr.zip -
creating BOM report in markdownthis creates the actual bom report that has the name{{matrix.project_name}}_bom_report.md -
upload reportthis uploads all artifact files
-{{matrix.project_name}}_schematic.pdf
-{{matrix.project_name}}_bill_of_materials.csv
-{{matrix.project_name}}_grbr.zip
-{{matrix.project_name}}_bom_report.md -
data for readme updatingthis create the json file as perviously discussed -
upload reportthis uploads the json file that was created as{{matrix.project_name}}_project.json
updating the readme
This is the coolest part of the workflow, this allows the repo to auto update the readme through yet again use of a mustache template, why did i do this because its pretty cool and it means i dont have to do it. However you can disable this feature by setting the project setting dynamic_read_me to false. The readme hash has a lot of information that can be used to update the readme and embed in to it. currently within the readme hash there is:
-
badge:
This action badge that can be seen below, in fact this is the exact action badge of the project and will auto update with the action. This badge will also update depending on the branch and where the repo is, so if you create a new repo from the template this badge will be pointing to your workflow.
-
lastest_action_run_link:
this is a link to the latest action run, as this action run has all the step summaries so you can have an easy link to show the output of the latest summary action -
did_error:
this allows the mustache templates to have a small amount of control flow allowing for different content to show if any of the workflow errors. -
title:
this is the project name that is defined in the project settings -
multiple_projects:
this is another flag to allow for control flow within the project, this defines whether there is multiple kicad project within the repo -
projects:
this is a list of the projects with serval names fields that are listed below. yes this list should remain in order if you want to do some strange stuff with indexing through it -
projects.project_name: this is the name of the project that is defined in project settings for the given project -
projects.project_link:
a link to the folder that the kicad project is in the repo for the given project -
projects.passing_erc:
a flag to say if the given project is passing erc for the given project -
projects.passing_erc_emoji:
an emoji for is the project is passing/failing erc this is currently defined in the processing output files script currently passing is ✅ and failing is ❌.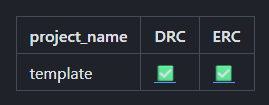
-
projects.erc_summary_link:
a link to the summary created in the workflow for the given project -
projects.passing_drc:
a flag to say if the given project is passing drc for the given project -
projects.passing_drc_emoji:
an emoji for is the project is passing/failing drc this is currently defined in the processing output files script currently passing is ✅ and failing is ❌. -
projects.drc_summary_link:
a link to the summary created in the workflow for the given project -
projects.gerber_link:
a link to gerbers created by the given project in the github repo -
projects.schematic_link:
a link to schematic pdf created by the given project in the github repo -
projects.bom_report_link:
a link to bom report created by the given project in the github repo -
projects.bom_csv_link:
a link to bom csv created by the given project in the github repo
using these some cool readmes can be created like the current one on the project. Where the table at the top not only shows the status of erc and drc but also the emojis link to the summary step repo. As can be seen below is the current readme template but this time with multiple failing projects in the repo.
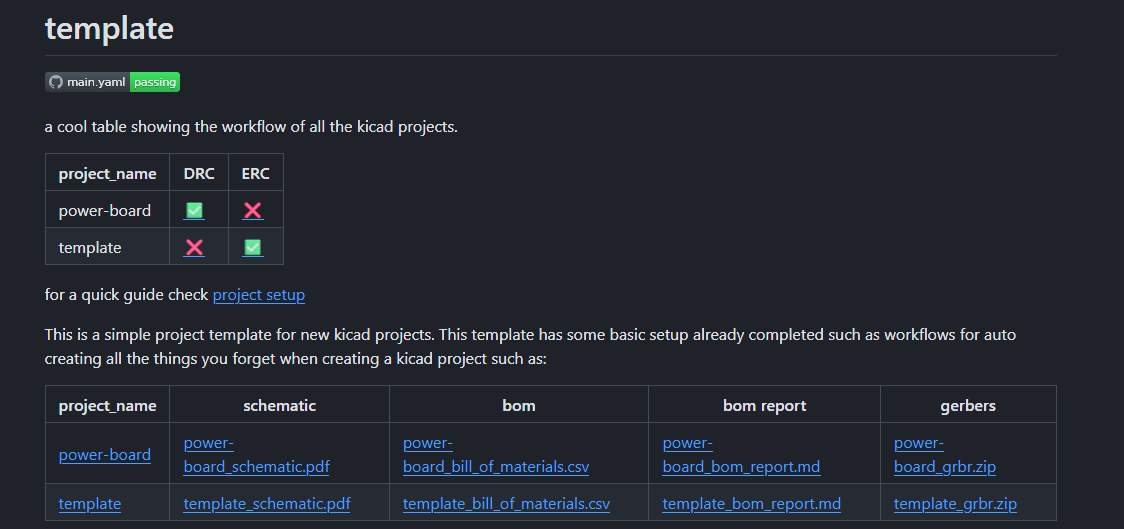 as can be seen in it the table of erc and drc shows that parts of each of them are failing and the links to produced files from all the projects below within a table.`
for the top table showing erc and drc checks using this mustache
as can be seen in it the table of erc and drc shows that parts of each of them are failing and the links to produced files from all the projects below within a table.`
for the top table showing erc and drc checks using this mustache
| project_name | DRC | ERC |
| ------------ | --- | --- |
{{#projects}}
| {{project_name}} | [{{passing_erc_emoji}}]({{erc_summary_link}})| [{{passing_drc_emoji}}]({{drc_summary_link}}) |
{{/projects}}
where this dynamically changing table which uses this mustache code
{{^multiple_projects}}
{{#projects}}
- [gerbers]({{gerber_link}})
- [bom]({{bom_report_link}})
- [schematic pdf]({{schematic_link}})
{{/projects}}
{{/multiple_projects}}

{{#multiple_projects}}
| project_name | schematic | bom | bom report | gerbers |
| ------------ | --------- | --- | ---------- | ------- |
{{#projects}}
| [{{project_name}}]({{project_link}}) | [{{project_name}}_schematic.pdf]({{schematic_link}}) | [{{project_name}}_bill_of_materials.csv]({{bom_csv_link}}) | [{{project_name}}_bom_report.md]({{bom_report_link}}) | [{{project_name}}_grbr.zip]({{gerber_link}}) |
{{/projects}}
{{/multiple_projects}}
the processing output files script takes all the *.json files created by the previous steps and creates the hash for the readme. it firstly strips out the readme_extras.json so if you want to add any other information to the hash i suggest you either add it in here or you modify the script. But more importantly i finally found a spot where i could use an else clause with a for loop and i just wanted to show it off. This snippet of combines all the *.json files using the project_name as a comment value to join all the json files in to a singular dictionary so if you want to add something in to every project in the project list just creates a *.json file with the line "project_name" : {{matrix.project_name}} and it should automatically to the project objects in the project list.
for report in reports_dicts:
        for project in readme_hash["projects"]:
            if project["project_name"] == report["project_name"]:
                for key in report.keys():
                    project.setdefault(key, report[key])
                break
        else:
            readme_hash["projects"].append(report)
dont forget this template can be changed for your use or more can be added within the processing output files script.
and to top it off the steps of the job.
-
checkoutcant run the update the readme if i dont have the repo -
read yaml fileneed to check if the readme should be updated -
download ercs filesthis downloads all the{{matrix.project_name}}_erc.jsonfiles for compiling -
download drcs filesthis downloads all the{{matrix.project_name}}_drc.jsonfiles for compiling -
download productions filesthis downloads all the{{matrix.project_name}}_project.jsonfiles for compiling -
Setting up Pythonneed something to run the script -
installing requirementscant run the python script if you dont have the requirements -
create extra info for readme hashthis step creates all the extra info for the hash, like the badge, latest action run link and the title -
create new readmecreates the new readme with the python script -
upload data for readme updatinguploads the readme for the last job to commit everything back to the repo
uploading production files
this last job takes all the production files created and uploads them to the repo, the only files that arnt uploaded are the *.json that are created to make the readme, as in this step the read me gets committed too. There really isnt much to it.
so the step to do this are:
-
checkoutcant push to the repo if i dont have it -
read yaml filethis is needed to get the correct paths to the location -
download production filesthis downloads all the production files made by the production-files step. -
download readmedownloads the readme from the updating the readme step -
check downloadsjust lists the current dir to check everything has been downloaded and where they are -
Moving files to correct locationthis moves the production files from their downloaded location to their new location -
commit production fileslastly this commits all the production files to the repo
improvements and future work
currently there are 4 cool ideas i am looking in to for future improvements to this template.
-
bom cost measurements
this idea which was perviously talked about in the Production files section, where i create some code to make api calls to some electronic parts supplier but this is annoying and will take a while to compute, as the mouser api only allows for 30 parts to be searched per minute, which will slow down the workflow. ive heard the digikey api, requires you updated your token monthly which people wont do and the workflow will break. Lastly octopart this thing is fucking dumb, $100 per month just for 10k searches what a scam.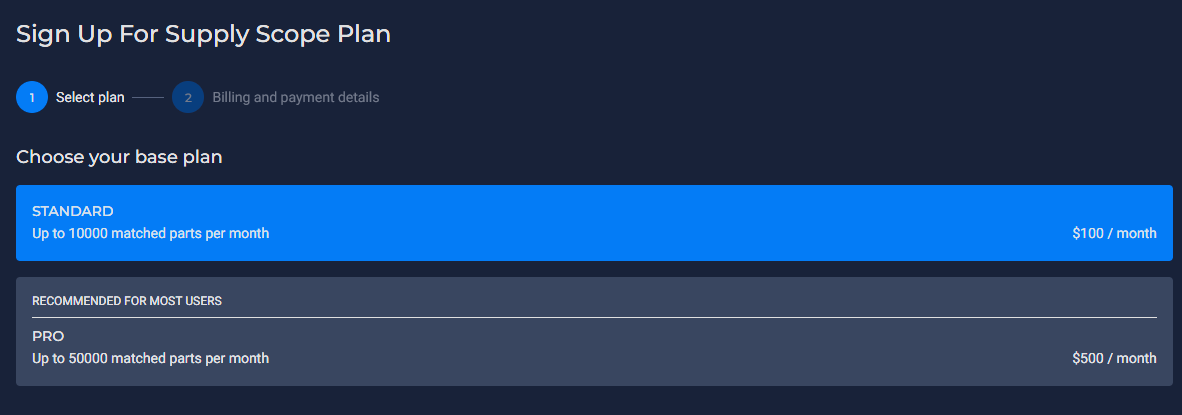
-
3d view of the pcb in the readme
this idea would create a 3d view of the main pcb to use in the readme, this would be done through using something like this headless python opengl context and exporting the PCB as a vrml. This would allow for a fully 3d colour render of the pcb -
more flexible project layout
this idea would allow the user to defined the output dir of all production files and where certain files are stored/called. so if you dont like the layout structure of the project then you could change it. or many if you dont like how i called the foldersHardware/instead ofhardware/or even{{project name}}_PROJECTcould then be changed tohardware_{{project name}}. -
testing
currently when i add a new feature to the repo i have a set of integration tests i have to complete to make sure everything still works, but this is very time consuming so some automatic test pipe line that would check when the template has been pushed to and then testing all the cases like, multiple projects, failing project, readme output and summary step outputs. would be very nice to have.